KVM Virtualization for Production environment
Convirture
Login to port 8083 on phoenix1Hosts setup
- Once the Virident card has been configured and updated to the 2.1.1 firmware version, we need to configure it as follows:
# mkfs.ext4 /dev/vgca0 -L KVM_DISK
# echo "/dev/vgca0       /`hostname -s`      ext4     defaults      0 0" >> /etc/fstab
# mkdir /`hostname -s`
# mount -a
- Now we need to add the
Convirtureconfiguration:cd /root/convirture-tools/install/managed_server/scripts ./convirt-tool install_dependencies ./convirt-tool --detect_only setup ./convirt-tool setup
- At this point the system should be able to virtualize any KVM guest.
Guests setup
Xen To KVM migration
In order to move an already installed Xen guest to Kvm, we need to follow these steps.- Host containing the Xen Guest:
xen12.lcg.cscs.ch - Host containing the KVM Guest:
xen06.lcg.cscs.chmountingppnfs.lcg.cscs.ch:/kvm_guests2 - Guest to be migrated:
test54.lcg.cscs.ch
- Install the latest
kernelin the Xen guest, in the example we have:# MYKERNEL=2.6.18-274.17.1.el5; yum install kernel-${MYKERNEL} kernel-headers-${MYKERNEL} --disableexcludes=main - Shutdown the Xen guest.
# shutdown -h now
- In the host that contains the Xen guest (xen12)
# dd if=/dev/vg_root/test54_root bs=8M | gzip | ssh ppnfs "gzip -d | dd of=/kvm_guests2/test54.root.xen bs=8M"
- Then we create the KVM Guest with the same parameters as the Xen machine. The most important are the location, size and name of the disk,
/dev/xvdaor/dev/hda, and the MAC address of the NIC. In our example we create an empty guest with 12G/dev/hdadisk on/kvm_guests2/test54.root.1 - Install that machine from the network using the
SL54-minimalkickstart file, which creates two partitions in the disk image and installs grub in the MBR.Do not forget to modify the dhcpd daemon running inpuppetto allow this kind of machine to be installed. Previous Xen Guests did not get installed using the kickstart procedure and fail to have the proper kickstart/pxe files configured.- /boot - 200 MB - ext3
- / - The remanining of the disk available - ext4
- Then, once we have the KVM guest booted, we need to install the same kernel version as we did in the Xen Guest.
# MYKERNEL=2.6.18-274.17.1.el5; yum install kernel-${MYKERNEL} kernel-headers-${MYKERNEL} --disableexcludes=main - Once this is done, shutdown the KVM guest.
- And we have to do a few things in the KVM host (xen06 in the example, remember) in order to migrate the data from the Xen Guest to the KVM Guest just installed:
# mkdir -p /root/xen2kvm/{xen,new,new.boot} # kpartx -al /kvm_guests2/test54.root.xen # mount /dev/mapper/loop1p1 /root/xen2kvm/xen/ -o ro # parted /kvm_guests2/test54.root.1 "unit B print" Model: (file) Disk /kvm_guests2/test54.root.1: 12884901888B Sector size (logical/physical): 512B/512B Partition Table: msdos Number Start End Size Type File system Flags 1 32256B 205631999B 205599744B primary ext3 boot 2 205632000B 12880788479B 12675156480B primary ext4 # Here we can see where the /boot partition starts (32256) as well as where / does it (205632000). # mount -o loop,offset=32256 /kvm_guests2/test54.root.1 /root/xen2kvm/new.boot/ # mount -o loop,offset=205632000 /kvm_guests2/test54.root.1 /root/xen2kvm/new/ - With these partitions mounted, all we have to do is to copy the contents of
/(minus some directories) from the mounted Xen Guest image to the mounted KVM Guest image.# cd /root/xen2kvm/ # We first copy it all to the new system, just to have a local reference of what was there before. This can be skipped. # rsync -av ./xen/* ./new/old_system/ --exclude='./xen/dev*' --exclude='./xen/lost+found*' --exclude='./xen/mnt/*' --exclude='./xen/sys*' --exclude='./xen/proc*' # rsync -av ./xen/* ./new/ --exclude='./xen/boot*' --exclude='./xen/dev*' --exclude='./xen/lost+found*' --exclude='./xen/mnt/*' --exclude='./xen/sys*' --exclude='./xen/proc*'
- Other small tasks must be done before we can boot the Kvm Guest:
- modify
/etc/inittaband remove entries of xvc while allowing the other remaining TTYs#co:2345:respawn:/sbin/agetty xvc0 9600 vt100-nav 1:2345:respawn:/sbin/mingetty tty1 2:2345:respawn:/sbin/mingetty tty2 3:2345:respawn:/sbin/mingetty tty3 4:2345:respawn:/sbin/mingetty tty4 5:2345:respawn:/sbin/mingetty tty5 6:2345:respawn:/sbin/mingetty tty6
- Remove xvc* from
/etc/securetty:# sed -i -e 's/xvc0//' securetty
- Make sure that the ethernet scripts in
/etc/sysconfig/network-scriptsare correct. - Modify
/etc/fstabin the KVM guest to mount and use the new/bootpartition and make sure that the filesystem for/corresponds to the one created by the kickstartSL54-minimal(very likely ext4):# echo "LABEL=/boot /boot ext3 defaults 1 1" >> ./new/etc/fstab
- Remove all entries related to xen in
/etc/modprobe.conf
- modify
- Don't forget to umount all the partitions so we can boot the KVM Guests:
# umount /root/xen2kvm/new
# umount /root/xen2kvm/new.boot
# umount /root/xen2kvm/xen
# kpartx -d /kvm_guests2/test54.root.xen
- At this point we should have a KVM Guest with is nearly identical to the original Xen Guest. Just boot it and see!
# shutdown -h now
- If everything works well, remove all the old kernels and xen packages no longer required.
# yum remove $(rpm -qa |grep xen) --disableexcludes=main
- Extra steps required on the KVM Guest once it boots:
- The Ganglia GMOND package must be updated.
# mount puppet:/cm /media
# rpm -Uvh /media/rpms/ganglia/ganglia-gmond-3.2.0-1.x86_64.rpm /media/rpms/ganglia/libganglia-3.2.0-1.x86_64.rpm
Preparing...                ########################################### [100%]
   1:libganglia             ########################################### [ 50%]
   2:ganglia-gmond          warning: /etc/ganglia/gmond.conf created as /etc/ganglia/gmond.conf.rpmnew
########################################### [100%]
# service gmond restart
Shutting down GANGLIA gmond:                               [  OK  ]
Starting GANGLIA gmond:                                    [  OK  ]
# service gmond status
gmond (pid 17354) is running...
# umount /media
- Disable not required services:
# chkconfig --del smartd
# chkconfig --del mlx_waiter
# /opt/cscs/sbin/disable_yum.sh
- Remove
sendmailand make sure thatpostfixis installed.# yum remove sendmail # service postfix status master (pid 2195) is running...
- The category of the machine must be switched from XEN_GUESTS to KVM_GUESTS in the cfengine tree and in the DSHGROUPS.
- The Ganglia GMOND package must be updated.
- If you find that the
/etc/fstabmounts a partition directly, for example as follows:/dev/xvdb /var/lib/ganglia/rrds ext3 defaults 0 2
You need to directly mount the image file that corresponds to the device in the Xen Guest:# mount -t ext3 /kvm01/ganglia.rrds.xen /root/xen2kvm/xen.extra/ -o loop
- http://adam.younglogic.com/2010/12/mounting-a-kvmqemu-vm-root-partition-in-fedora-14/

- http://www.andremiller.net/content/mounting-hard-disk-image-including-partitions-using-linux
- http://fedoraproject.org/wiki/Anaconda/Kickstart#part_or_partition
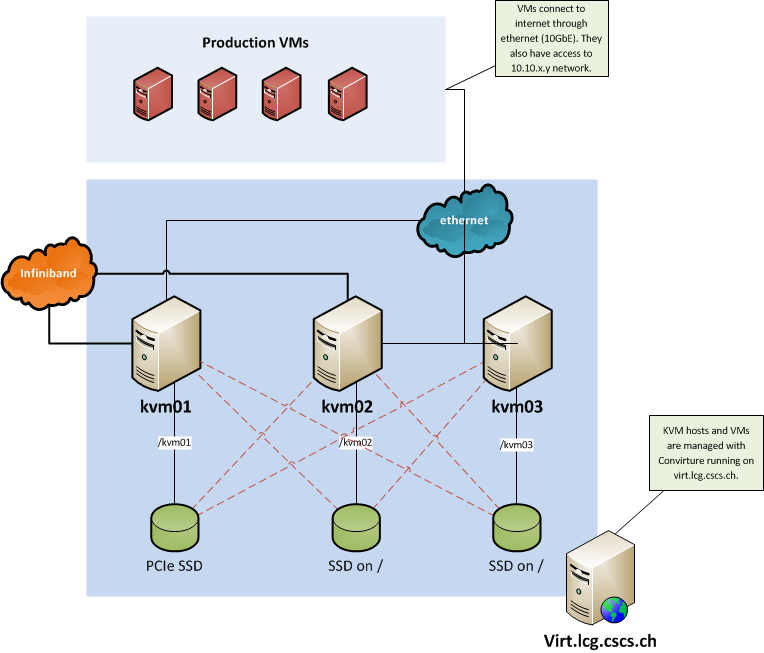
KVM bridge setup
KVM machines have a 10GbE NIC that is bridged to the IB network. The eth0 interface is configured on the managmnet network and is also bridged to allow access to virtual machines. As usual the eth1 is the 1GbE interfrace. These are presented to the guest virtual machines as follows.Feb 14 10:40 [root@kvm03:~]# brctl show
bridge name bridge id STP enabled interfaces
br0 8000.6cae8b24759a no eth0
br1 8000.6cae8b24759b no eth1
br4 8000.90e2ba2ff394 no eth4 #10GbE NIC
virbr0 8000.5254006f09d8 yes virbr0-nic
The 1GbE resides on 10.10.64.xx
Feb 14 10:48 [root@kvm03:~]# ifconfig br1 | grep addr
br1 Link encap:Ethernet HWaddr 6C:AE:8B:24:75:9B
 inet addr:10.10.64.94 Bcast:10.10.67.255 Mask:255.255.252.0
 inet6 addr: fe80::6eae:8bff:fe24:759b/64 Scope:Link
The 10GbE is on 10.10.68.xx
Feb 14 10:48 [root@kvm03:~]# ifconfig br4 | grep addr
br4 Link encap:Ethernet HWaddr 90:E2:BA:2F:F3:94
 inet addr:10.10.68.92 Bcast:10.10.71.255 Mask:255.255.252.0
 inet6 addr: fe80::92e2:baff:fe2f:f394/64 Scope:Link
And the bridge for the managment network.
Feb 14 10:48 [root@kvm03:~]# ifconfig br0 | grep addr
br0 Link encap:Ethernet HWaddr 6C:AE:8B:24:75:9A
 inet addr:192.168.68.92 Bcast:192.168.71.255 Mask:255.255.252.0
 inet6 addr: fe80::6eae:8bff:fe24:759a/64 Scope:Link
Within Convirt you will find a template named "Service_SL6_KVM02" which has a layout for the MAC address for guest virtual machines. Note the bridges are numbered sequentialy, when deploying a virtual machine you may need to edit the bridge number (e.g. br2 changes to br4). br0 00:19:3E:64:xx:xx
br1 00:10:3E:66:xx:xx
br2 00:16:3E:66:xx:xx
The remaing two octects of a guest machines MAC address will typically be :00: and the last segment of its IP. For example the machine sdbii03 has the IP of 148.187.66.53 so its MAC addresses are as follows. Note the managment bridge is not used with this machine at the time of writting.
eth1 Link encap:Ethernet HWaddr 00:10:3E:66:00:53
eth2 Link encap:Ethernet HWaddr 00:16:3E:66:00:53
HowTos & Tricks
Emergency reset KVM guest
If CONVIRT is not responding property and you need to reset a VM, you can send the reset signal directly to the monitor.echo system_reset | socat - UNIX-CONNECT:/var/run/kvm/monitors/sbdii01You can also directly connect to the qemu monitor with:
socat - UNIX-CONNECT:/var/run/kvm/monitors/sbdii01
Enable VIRTIO drivers on KVM Guests already installed
- Upgrade the guest to the latest available Kernel
# yum update kernel --disableexcludes=main
- Reboot the guest.
- Once booteed with the new kernel, add these lines to
/etc/rc.d/rc.sysinit. Find these linesif [ -f /etc/rc.modules ]; then /etc/rc.modules fi
And add the following lines to make it look like this:if [ -f /etc/rc.modules ]; then /etc/rc.modules fi modprobe virtio modprobe virtio_ring # Comment this out if you do not need block driver modprobe virtio_blk # Comment this out if you do not need block driver modprobe virtio_net # Comment this out if you do not need net driver modprobe virtio_pci - Create the new
initrdwith the virtio drivers# mkinitrd --with virtio_pci --with virtio_blk --with virtio_balloon --with virtio_ring --with virtio_net -f /boot/initrd-$(uname -r).img $(uname -r)
- Modify
/boot/grub/device.mapto make use of the virtual device (vda) instead of the hda:# cat /boot/grub/device.map # this device map was generated by anaconda #(hd0) /dev/hda (hd0) /dev/vda
- Modify the file
/boot/grub/grub.confto reflect these changes if required. Replace hdX for vdX. - Modify the file
/etc/fstabto reflect also these changes. - Shutdown the guest and do the following changes in the guest settings using the KVM Console:
- Storage, Edit, VM Device: vda
- Networks, Edit, Model: virtio
- Boot the guest, it should now be using the correct virtio drivers.
Performance tests on virtio drivers
These tests are intended to show the performance differences of using the virtio drivers on a KVM guest already installed and working in production without the virtio drivers. Keep in mind that, for this test, the host runs the KVM guess off a Virident SSD card and the network goes through a shared 1gigabit ethernet card.- Tests prior to the utilization of virtio drivers:
Feb 21 13:54 [root@pub:tmp]# bonnie++ -u root -s 3500 -r 0 -b -d /tmp/ Using uid:0, gid:0. Writing a byte at a time...done Writing intelligently...done Rewriting...done Reading a byte at a time...done Reading intelligently...done start 'em...done...done...done...done...done... Create files in sequential order...done. Stat files in sequential order...done. Delete files in sequential order...done. Create files in random order...done. Stat files in random order...done. Delete files in random order...done. Version 1.96 ------Sequential Output------ --Sequential Input- --Random- Concurrency 1 -Per Chr- --Block-- -Rewrite- -Per Chr- --Block-- --Seeks-- Machine Size K/sec %CP K/sec %CP K/sec %CP K/sec %CP K/sec %CP /sec %CP pub.lcg.cscs. 3500M 656 99 268088 36 210303 43 2332 99 2888528 98 5809 85 Latency 22167us 3613ms 161ms 4416us 1152us 141ms Version 1.96 ------Sequential Create------ --------Random Create-------- pub.lcg.cscs.ch -Create-- --Read--- -Delete-- -Create-- --Read--- -Delete-- files /sec %CP /sec %CP /sec %CP /sec %CP /sec %CP /sec %CP 16 844 4 +++++ +++ 901 2 912 3 +++++ +++ 900 3 Latency 48674us 499us 43622us 31281us 69us 51034us 1.96,1.96,pub.lcg.cscs.ch,1,1329834146,3500M,,656,99,268088,36,210303,43,2332,99,2888528,98,5809,85,16,,,,,844,4,+++++,+++,901,2,912,3,+++++,+++,900,3,22167us,3613ms,161ms,4416us,1152us,141ms,48674us,499us,43622us,31281us,69us,51034us Feb 21 13:56 [root@pub:tmp]# dd if=/dev/zero of=/tmp/thing bs=1024 count=1024k 1048576+0 records in 1048576+0 records out 1073741824 bytes (1.1 GB) copied, 3.76979 seconds, 285 MB/s Feb 21 13:56 [root@pub:tmp]# dd if=/tmp/thing of=/dev/null 2097152+0 records in 2097152+0 records out 1073741824 bytes (1.1 GB) copied, 1.97504 seconds, 544 MB/s Feb 21 14:03 [root@pub:tmp]# iperf -c 148.187.66.79 -P8 ------------------------------------------------------------ Client connecting to 148.187.66.79, TCP port 5001 TCP window size: 27.7 KByte (default) ------------------------------------------------------------ [ 10] local 148.187.66.50 port 34822 connected with 148.187.66.79 port 5001 [ 3] local 148.187.66.50 port 34815 connected with 148.187.66.79 port 5001 [ 9] local 148.187.66.50 port 34821 connected with 148.187.66.79 port 5001 [ 4] local 148.187.66.50 port 34816 connected with 148.187.66.79 port 5001 [ 5] local 148.187.66.50 port 34817 connected with 148.187.66.79 port 5001 [ 7] local 148.187.66.50 port 34819 connected with 148.187.66.79 port 5001 [ 8] local 148.187.66.50 port 34820 connected with 148.187.66.79 port 5001 [ 6] local 148.187.66.50 port 34818 connected with 148.187.66.79 port 5001 [ ID] Interval Transfer Bandwidth [ 10] 0.0-10.1 sec 98.7 MBytes 82.0 Mbits/sec [ ID] Interval Transfer Bandwidth [ 5] 0.0-10.2 sec 6.25 MBytes 5.16 Mbits/sec [ ID] Interval Transfer Bandwidth [ 9] 0.0-10.3 sec 93.9 MBytes 76.6 Mbits/sec [ ID] Interval Transfer Bandwidth [ 7] 0.0-10.4 sec 80.9 MBytes 65.0 Mbits/sec [ ID] Interval Transfer Bandwidth [ 4] 0.0-10.5 sec 7.14 MBytes 5.72 Mbits/sec [ ID] Interval Transfer Bandwidth [ 6] 0.0-12.3 sec 2.39 MBytes 1.63 Mbits/sec [ ID] Interval Transfer Bandwidth [ 8] 0.0-12.3 sec 4.54 MBytes 3.10 Mbits/sec [ ID] Interval Transfer Bandwidth [ 3] 0.0-13.3 sec 66.4 MBytes 41.8 Mbits/sec [SUM] 0.0-13.3 sec 360 MBytes 227 Mbits/sec - Tests after the configuration with the virtio drivers:
Feb 21 14:37 [root@pub:~]# bonnie++ -u root -s 3500 -r 0 -b -d /tmp/
Using uid:0, gid:0.
Writing a byte at a time...done
Writing intelligently...done
Rewriting...done
Reading a byte at a time...done
Reading intelligently...done
start 'em...done...done...done...done...done...
Create files in sequential order...done.
Stat files in sequential order...done.
Delete files in sequential order...done.
Create files in random order...done.
Stat files in random order...done.
Delete files in random order...done.
Version  1.96       ------Sequential Output------ --Sequential Input- --Random-
Concurrency   1     -Per Chr- --Block-- -Rewrite- -Per Chr- --Block-- --Seeks--
Machine        Size K/sec %CP K/sec %CP K/sec %CP K/sec %CP K/sec %CP  /sec %CP
pub.lcg.cscs. 3500M   662  99 268975  36 309165  37  1672  99 2856648  99  5189  91
Latency             23298us    2999ms   53022us   12488us    7251us   34114us
Version  1.96       ------Sequential Create------ --------Random Create--------
pub.lcg.cscs.ch     -Create-- --Read--- -Delete-- -Create-- --Read--- -Delete--
              files  /sec %CP  /sec %CP  /sec %CP  /sec %CP  /sec %CP  /sec %CP
                 16  1129   4 +++++ +++  1232   3  1134   4 +++++ +++  1191   3
Latency             75203us     479us   20673us   25429us      41us   30933us
1.96,1.96,pub.lcg.cscs.ch,1,1329829199,3500M,,662,99,268975,36,309165,37,1672,99,2856648,99,5189,91,16,,,,,1129,4,+++++,+++,1232,3,1134,4,+++++,+++,1191,3,23298us,2999ms,53022us,12488us,7251us,34114us,75203us,479us,20673us,25429us,41us,30933us

Feb 21 14:38 [root@pub:~]# dd if=/dev/zero of=/tmp/thing bs=1024 count=1024k
1048576+0 records in
1048576+0 records out
1073741824 bytes (1.1 GB) copied, 3.87157 seconds, 277 MB/s

Feb 21 14:40 [root@pub:~]# dd if=/tmp/thing of=/dev/null
2097152+0 records in
2097152+0 records out
1073741824 bytes (1.1 GB) copied, 2.06677 seconds, 520 MB/s

Feb 21 14:40 [root@pub:~]# iperf -c 148.187.66.79 -P8
------------------------------------------------------------
Client connecting to 148.187.66.79, TCP port 5001
TCP window size: 27.7 KByte (default)
------------------------------------------------------------
[  8] local 148.187.66.50 port 34103 connected with 148.187.66.79 port 5001
[  4] local 148.187.66.50 port 34099 connected with 148.187.66.79 port 5001
[  5] local 148.187.66.50 port 34100 connected with 148.187.66.79 port 5001
[  6] local 148.187.66.50 port 34101 connected with 148.187.66.79 port 5001
[  7] local 148.187.66.50 port 34102 connected with 148.187.66.79 port 5001
[ 10] local 148.187.66.50 port 34105 connected with 148.187.66.79 port 5001
[  3] local 148.187.66.50 port 34098 connected with 148.187.66.79 port 5001
[  9] local 148.187.66.50 port 34104 connected with 148.187.66.79 port 5001
[ ID] Interval       Transfer     Bandwidth
[  6]  0.0-10.0 sec    126 MBytes    105 Mbits/sec
[ ID] Interval       Transfer     Bandwidth
[  8]  0.0-10.0 sec    144 MBytes    120 Mbits/sec
[ ID] Interval       Transfer     Bandwidth
[  9]  0.0-10.0 sec    123 MBytes    103 Mbits/sec
[ ID] Interval       Transfer     Bandwidth
[  5]  0.0-10.0 sec    134 MBytes    112 Mbits/sec
[ ID] Interval       Transfer     Bandwidth
[ 10]  0.0-10.0 sec    117 MBytes  98.2 Mbits/sec
[ ID] Interval       Transfer     Bandwidth
[  3]  0.0-10.0 sec    103 MBytes  86.3 Mbits/sec
[ ID] Interval       Transfer     Bandwidth
[  4]  0.0-10.0 sec    125 MBytes    105 Mbits/sec
[ ID] Interval       Transfer     Bandwidth
[  7]  0.0-10.1 sec    135 MBytes    112 Mbits/sec
[SUM]  0.0-10.1 sec  1007 MBytes    840 Mbits/sec
Important documents
- KVM tips: http://www.nico.schottelius.org/blog/control-and-shutdown-qemu-kvm-vm-via-unix-socket/
- IBM KVM Good practices guide: http://publib.boulder.ibm.com/infocenter/lnxinfo/v3r0m0/topic/liaat/liaatbestpractices_pdf.pdf
- RHEL 6 KVM Guide: http://docs.redhat.com/docs/en-US/Red_Hat_Enterprise_Linux/6/html/Virtualization_Host_Configuration_and_Guest_Installation_Guide/ch10s02.html


| I | Attachment | History | Action | Size | Date | Who | Comment |
|---|---|---|---|---|---|---|---|
| |
kvm.png | r1 | manage | 75.2 K | 2013-02-21 - 11:00 | MiguelGila | |
| |
networkSchemaProdVMs.png | r1 | manage | 75.2 K | 2013-02-21 - 10:58 | MiguelGila |
Topic revision: r19 - 2015-03-18 - DinoConciatore

Ideas, requests, problems regarding TWiki? Send feedback