KVM Virtualization for Production environment
Hosts setup
- Once the Virident card has been configured and updated to the 2.1.1 firmware version, we need to configure it as follows:
# mkfs.ext4 /dev/vgca0 -L KVM_DISK
# echo "/dev/vgca0       /`hostname -s`      ext4     defaults      0 0" >> /etc/fstab
# mkdir /`hostname -s`
# mount -a
- Now we need to add the
Convirtureconfiguration:cd /root/convirture-tools/install/managed_server/scripts ./convirt-tool install_dependencies ./convirt-tool --detect_only setup ./convirt-tool setup
- At this point the system should be able to virtualize any KVM guest.
Guests setup
Xen To KVM migration
In order to move an already installed Xen guest to Kvm, we need to follow these steps.- Host containing the Xen Guest:
xen12.lcg.cscs.ch - Host containing the KVM Guest:
xen06.lcg.cscs.chmountingppnfs.lcg.cscs.ch:/kvm_guests2 - Guest to be migrated:
test54.lcg.cscs.ch
- Install the latest
kernelin the Xen guest, in the example we have:# MYKERNEL=2.6.18-274.17.1.el5; yum install kernel-${MYKERNEL} kernel-headers-${MYKERNEL} --disableexcludes=main - Shutdown the Xen guest.
# shutdown -h now
- In the host that contains the Xen guest (xen12)
# dd if=/dev/vg_root/test54_root bs=8M | gzip | ssh ppnfs "gzip -d | dd of=/kvm_guests2/test54.root.xen bs=8M"
- Then we create the KVM Guest with the same parameters as the Xen machine. The most important are the location, size and name of the disk,
/dev/xvdaor/dev/hda, and the MAC address of the NIC. In our example we create an empty guest with 12G/dev/hdadisk on/kvm_guests2/test54.root.1 - Install that machine from the network using the
SL54-minimalkickstart file, which creates two partitions in the disk image and installs grub in the MBR.Do not forget to modify the dhcpd daemon running inpuppetto allow this kind of machine to be installed. Previous Xen Guests did not get installed using the kickstart procedure and fail to have the proper kickstart/pxe files configured.- /boot - 200 MB - ext3
- / - The remanining of the disk available - ext4
- Then, once we have the KVM guest booted, we need to install the same kernel version as we did in the Xen Guest.
# MYKERNEL=2.6.18-274.17.1.el5; yum install kernel-${MYKERNEL} kernel-headers-${MYKERNEL} --disableexcludes=main - Once this is done, shutdown the KVM guest.
- And we have to do a few things in the KVM host (xen06 in the example, remember) in order to migrate the data from the Xen Guest to the KVM Guest just installed:
# mkdir -p /root/xen2kvm/{xen,new,new.boot} # kpartx -al /kvm_guests2/test54.root.xen # mount /dev/mapper/loop1p1 /root/xen2kvm/xen/ -o ro # parted /kvm_guests2/test54.root.1 "unit B print" Model: (file) Disk /kvm_guests2/test54.root.1: 12884901888B Sector size (logical/physical): 512B/512B Partition Table: msdos Number Start End Size Type File system Flags 1 32256B 205631999B 205599744B primary ext3 boot 2 205632000B 12880788479B 12675156480B primary ext4 # Here we can see where the /boot partition starts (32256) as well as where / does it (205632000). # mount -o loop,offset=32256 /kvm_guests2/test54.root.1 /root/xen2kvm/new.boot/ # mount -o loop,offset=205632000 /kvm_guests2/test54.root.1 /root/xen2kvm/new/ - With these partitions mounted, all we have to do is to copy the contents of
/(minus some directories) from the mounted Xen Guest image to the mounted KVM Guest image.# cd /root/xen2kvm/ # We first copy it all to the new system, just to have a local reference of what was there before. This can be skipped. # rsync -av ./xen/* ./new/old_system/ --exclude='./xen/dev*' --exclude='./xen/lost+found*' --exclude='./xen/mnt/*' --exclude='./xen/sys*' --exclude='./xen/proc*' # rsync -av ./xen/* ./new/ --exclude='./xen/boot*' --exclude='./xen/dev*' --exclude='./xen/lost+found*' --exclude='./xen/mnt/*' --exclude='./xen/sys*' --exclude='./xen/proc*'
- Other small tasks must be done before we can boot the Kvm Guest:
- modify
/etc/inittaband remove entries of xvc while allowing the other remaining TTYs#co:2345:respawn:/sbin/agetty xvc0 9600 vt100-nav 1:2345:respawn:/sbin/mingetty tty1 2:2345:respawn:/sbin/mingetty tty2 3:2345:respawn:/sbin/mingetty tty3 4:2345:respawn:/sbin/mingetty tty4 5:2345:respawn:/sbin/mingetty tty5 6:2345:respawn:/sbin/mingetty tty6
- Remove xvc* from
/etc/securetty:# sed -i -e 's/xvc0//' securetty
- Make sure that the ethernet scripts in
/etc/sysconfig/network-scriptsare correct. - Modify
/etc/fstabin the KVM guest to mount and use the new/bootpartition and make sure that the filesystem for/corresponds to the one created by the kickstartSL54-minimal(very likely ext4):# echo "LABEL=/boot /boot ext3 defaults 1 1" >> ./new/etc/fstab
- modify
- Don't forget to umount all the partitions so we can boot the KVM Guests:
# umount /root/xen2kvm/new
# umount /root/xen2kvm/new.boot
# umount /root/xen2kvm/xen
# kpartx -d /kvm_guests2/test54.root.xen
- At this point we should have a KVM Guest with is nearly identical to the original Xen Guest. Just boot it and see!
# shutdown -h now
- If everything works well, remove all the old kernels and xen packages no longer required.
# yum remove $(rpm -qa |grep xen) --disableexcludes=main
- Extra steps required on the KVM Guest once it boots:
- The Ganglia GMOND package must be updated.
# mount puppet:/cm /media
# rpm -Uvh /media/rpms/ganglia/ganglia-gmond-3.2.0-1.x86_64.rpm /media/rpms/ganglia/libganglia-3.2.0-1.x86_64.rpm
Preparing...                ########################################### [100%]
   1:libganglia             ########################################### [ 50%]
   2:ganglia-gmond          warning: /etc/ganglia/gmond.conf created as /etc/ganglia/gmond.conf.rpmnew
########################################### [100%]
# service gmond restart
Shutting down GANGLIA gmond:                               [  OK  ]
Starting GANGLIA gmond:                                    [  OK  ]
# service gmond status
gmond (pid 17354) is running...
# umount /media
- Disable not required services:
# chkconfig --del smartd
# chkconfig --del mlx_waiter
# /opt/cscs/sbin/disable_yum.sh
- Remove
sendmailand make sure thatpostfixis installed.# yum remove sendmail # service postfix status master (pid 2195) is running...
- The category of the machine must be switched from XEN_GUESTS to KVM_GUESTS in the cfengine tree and in the DSHGROUPS.
- The Ganglia GMOND package must be updated.
- If you find that the
/etc/fstabmounts a partition directly, for example as follows:/dev/xvdb /var/lib/ganglia/rrds ext3 defaults 0 2
You need to directly mount the image file that corresponds to the device in the Xen Guest:# mount -t ext3 /kvm01/ganglia.rrds.xen /root/xen2kvm/xen.extra/ -o loop
- http://adam.younglogic.com/2010/12/mounting-a-kvmqemu-vm-root-partition-in-fedora-14/

- http://www.andremiller.net/content/mounting-hard-disk-image-including-partitions-using-linux
- http://fedoraproject.org/wiki/Anaconda/Kickstart#part_or_partition
Important documents
http://publib.boulder.ibm.com/infocenter/lnxinfo/v3r0m0/topic/liaat/liaatbestpractices_pdf.pdf

| I | Attachment | History | Action | Size | Date | Who | Comment |
|---|---|---|---|---|---|---|---|
| |
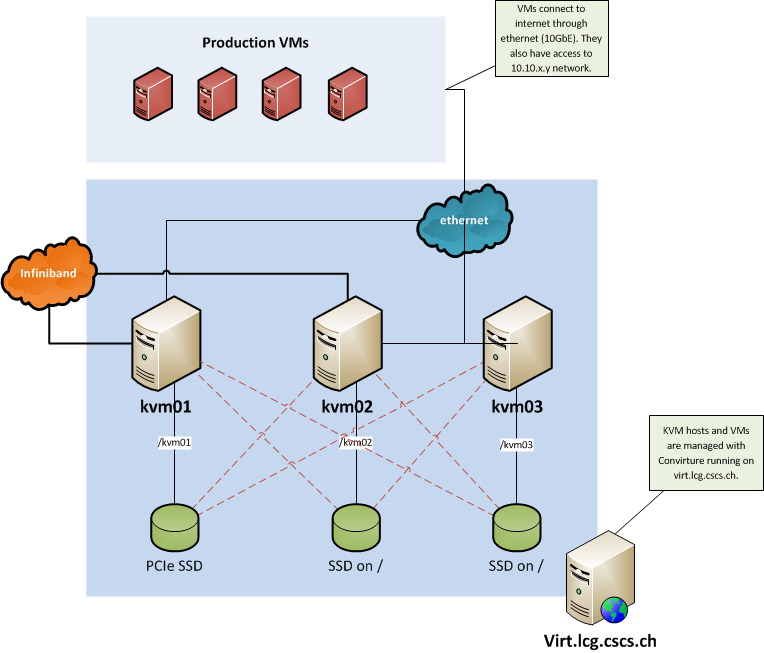
networkSchemaProdVMs.png | r1 | manage | 53.7 K | 2012-01-20 - 13:51 | MiguelGila | Network Schema Production VMs |
Topic revision: r14 - 2012-02-21 - MiguelGila

Ideas, requests, problems regarding TWiki? Send feedback