PreProduction environment setup
General information
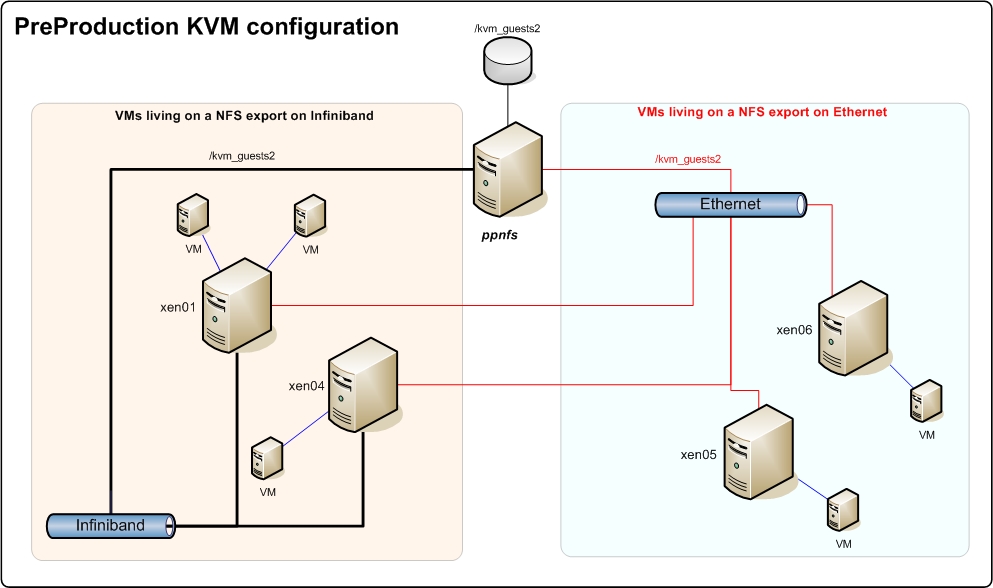
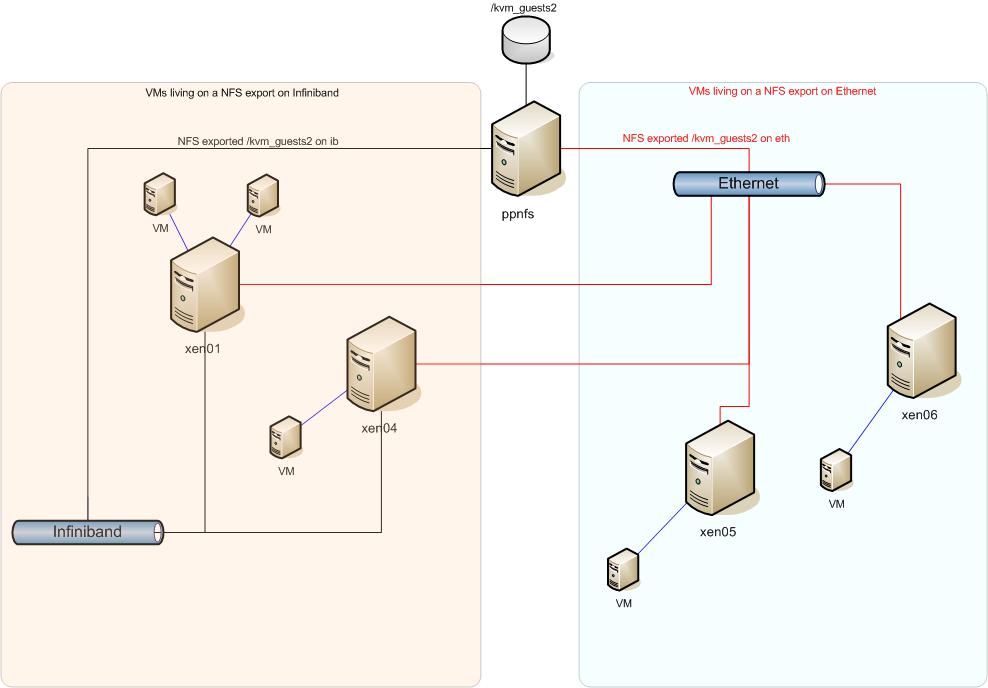
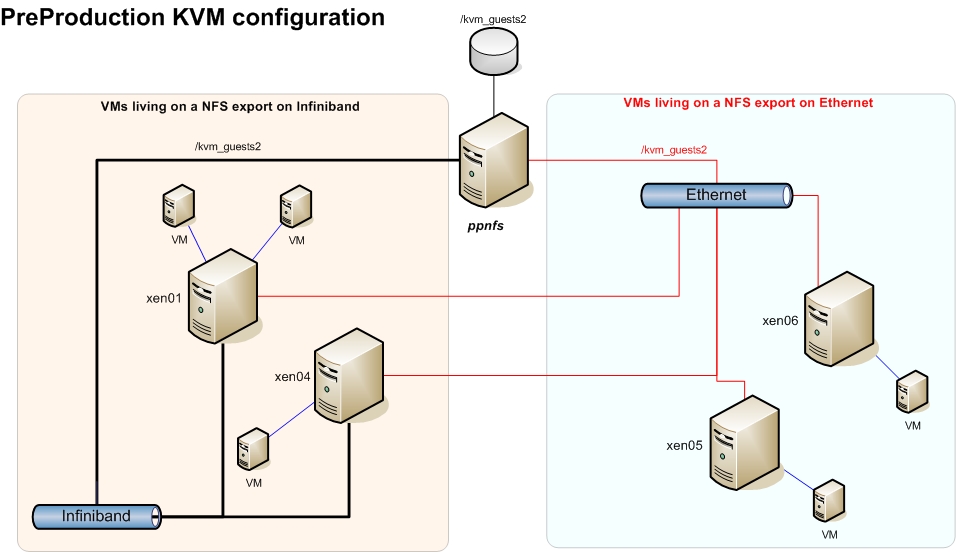 The PreProduction cluster is a set of KVM hosts (DSH group KVM_HOSTS:
 xen01,xen[04-08]) and a bunch of KVM guests (DSH group KVM_GUESTS: pp*, nagios). The set of hosts mount /kvm_guests2 off a NFS share exported by ppnfs and the guests use the files in it as a hard disk image:Oct 31 09:49 [root@ppnfs:~]# ls -lh /kvm_guests2/ total 114G drwx------ 2 root root 16K Oct 18 17:20 lost+found -rw-r--r-- 1 root root 12G Oct 31 09:49 nagios.root -rw-r--r-- 1 root root 12G Oct 31 09:49 ppapel.root -rw-r--r-- 1 root root 12G Oct 31 09:49 ppargus01.root -rw-r--r-- 1 root root 12G Oct 31 09:49 ppbdii01.root -rw-r--r-- 1 root root 12G Oct 25 09:04 ppcluster.root -rw-r--r-- 1 root root 12G Oct 31 09:49 ppcream01.root -rw-r--r-- 1 root root 12G Oct 31 09:49 ppcream02.root -rw-r--r-- 1 root root 12G Oct 31 09:49 pplrms01.root -rw-r--r-- 1 root root 12G Oct 31 09:49 pplrms02.root -rw-r--r-- 1 root root 12G Oct 31 09:49 pptopbdii.root -rw-r--r-- 1 root root 12G Oct 31 09:49 ppui.root -rw-r--r-- 1 root root 12G Oct 31 09:49 ppwms.root -rw-r--r-- 1 root root 12G Oct 31 09:49 ppwn01.root -rw-r--r-- 1 root root 12G Oct 31 09:49 ppwn02.root -rw-r--r-- 1 root root 12G Oct 31 09:49 ppwn03.root -rw-r--r-- 1 root root 12G Oct 31 09:49 ppwn04.rootThe idea was to use the infiniband network to mount the guest's disks and the ethernet for normal ethernet operation, but because not all hosts have an Infiniband network card, some will use the ethernet card also to mount guest's disks. These guests are fully virtualized, so we can test the same kernel version and packages that the production machines have, without any further compilation or tweak.
Administration console
The best way to manage all these guests and hosts is through the Convirture management console installed inpub.lcg.cscs.ch. To access it, use the link available in the local nagiosInstalling a new host
Since RedHat released RHEL 6, it is much easier to create KVM guests and, therefore, the recommended OS for KVM hosts is SL6.- Install a new machine with SL6 and make sure that the new machine is listed under the category of KVM_HOSTS and cfengine has ran. This does the following changes (among others):
- Creates /kvm_guests2
- Makes sure the Convirture software is installed.
- Adds the mount of /kvm_guests2 from ppnfs.
- Installs KVM packages
- Copies the SSH key of the convirture user in pub
- Install the Convirture dependencies and files:
cd /root/convirture-tools/install/managed_server/scripts
./convirt-tool install_dependencies
./convirt-tool --detect_only setup
./convirt-tool setup
- If required (when machine is not ONLY in infiniband network), add the corresponding route back from ppnfs to the machine just installed. This can be done either by adding routes manually
route add -host 148.187.67.115 gw 148.187.68.2 # xen05.lcg.cscs.ch via firewall
route add -host 148.187.67.116 gw 148.187.68.2 # xen06.lcg.cscs.ch via firewall.
Or by modifying/srv/cfengine/files/ppnfs/etc/sysconfig/network-scripts/route-ib0accordingly. - Try to connect as user convirt from pub to the new created machine. This would add the ssh key to the keyring of the user convirt in pub.
- Mount all the filesystems, and make sure that
/kvm_guests2is accessible. - Add the machine to the Convirture console.
Installing a new guest
To create a new guest from scratch, follow these steps:- Open the Convirture console, select one of the templates under Template Library (SL5-generic-PP is the base one for SL5 grid machines) and click
provision. - In the "Select a Target Node" window, choose the destination KVM host to be used.
- That opens the "Provision Virtual Machine" interface, which allows us to configure more settings. Special attention must be paid to the VM (the VM name), Memory (MB) boxes in the General tab and the MAC address of the br0 Network device under Networks tab. Usually, the MAC is formed like this:
00:10:3E:64:IP:IP. So, for example, if the machine to create is namedppcluster.lcg.cscs.chwith public IP 148.187.64.207, we would have to set the following:General/VM: ppcluster General/Memory (MB): 2048 Networks/br0 MAC: 00:10:3E:64:02:07
Please, take into account that this procedure might change in the future. - Now it is time to add the corresponding DHCP entries in the dhcp configuration file cfengine.lcg.cscs.ch
/srv/cfengine/files/LINUX/etc/dhcpd.conf.lcg.cscs.ch:host ppcluster-internal { hardware ethernet 00:10:3E:64:02:07; fixed-address 10.10.64.207; option host-name "ppcluster.lcg.cscs.ch"; } - Once this is done, go to the dhcp server machine (at the time of writting this:
xen03.lcg.cscs.ch), run cfengine and restart the dhcpd service. - At this point, we need to tell the installing server (at the time of wrtting this:
xen11.lcg.cscs.ch) what to do with the IP address that the client will be given. So, we need to create the symbolink link with the IP of the hostname in the 10.10 network:# cd /tftpboot/pxelinux.cfg/ # ./ip2hex.sh 10.10.64.207 0A0A40CF # ln -s SL57-service.kvm 0A0A40CF # ls -lha |grep 0A0A40CF lrwxrwxrwx 1 root root 16 Oct 31 15:28 0A0A40CF -> SL57-service.kvm
Now it is a good moment to open the fileSL57-service.kvmand the kickstart it points to and check if everything is okay with the configuration. - Once all the previous steps are done, we should be ready to boot the machine and set it to install. Right click on the machine name, set the boot device to network and start it.
- When the kickstart file is processed, the guest will shut down and you will have to manually start it again to continue the setup process. This is done in this way because it is not possible to change the guest's boot order from the guest itself, so if you set it to boot using pxe, on each reboot it will continue booting using pxe until it is shut down and started again.
- After a few reboots, the guest machine should be operative.
- Update the machine packages and the kernel.
yum update
yum update kernel --disableexcludes=main
- Create cfengine key in
cfengine:/srv/cfengine/ppkeysCFKEY_HOST=ppargus01 CFKEY_IP=$(host $CFKEY_HOST |awk '{print $4}') cd /srv/cfengine/ppkeys/ cfkey -f root-$CFKEY_IP - Copy the keys to
nfs:/export/kickstarts/private/cfengine/scp /srv/cfengine/ppkeys/root-$CFKEY_IP* nfs:/export/kickstarts/private/cfengine/
- Copy ssh keys to cfengine server.
cd /srv/cfengine/private/ssh/ mkdir $CFKEY_HOST ls se30|xargs -n1 --replace scp $CFKEY_HOST:/etc/ssh/{} $CFKEY_HOST/ - Check in ssh key to svn
asvn add $CFKEY_HOST
asvn commit $CFKEY_HOST --username miguelgi -m"New SSH keys for host $CFKEY_HOST"
- Create new
known_hostfile./srv/cfengine/scripts/new_known_hosts
- Run cfengine in the recently installed machine
cfagent -q
Reinstalling a guest
- Using the Convirture console, right click on the name of the guest and set the boot device to network. Start it.
- The guest should boot using the pxe configuration that the install server (at the time of writting: xen11.lcg.cscs.ch) has for it. For example,
ppcream02is configured as follows:# hostname xen11.lcg.cscs.ch # pwd /tftpboot/pxelinux.cfg # ./ip2hex.sh 10.10.64.212 0A0A40D4 # ls -lha |grep 0A0A40D4 lrwxrwxrwx 1 root root 16 Sep 8 17:17 0A0A40D4 -> SL57-service.kvm
- Once the kickstart file is processed, the guest will shut down and you will have to manually start it again to continue the setup process. This is done in this way because it is not possible to change the guest's boot order from the guest itself, so if you set it to boot using pxe, on each reboot it will continue booting using pxe until it is shut down and started again.
- After a few reboots, the guest machine should be operative.
- As a good measure, you can always run cfengine once again.
cfagent -q
Tips and tricks
What to do if the clock of the guests shifts
Sometimes, if the host does not have constant TSC, some tunning must be done to reduce the chances of the guests to shift the system's clock. To find out dogrep constant_tsc /proc/cpuinfoIf any output is given your CPU has the constant_tsc bit. If no output is given, follow the instructions below. For more info, refer to the RHEL 6 Virtualization manual
- Enable
ntpdateand make sure it is actually updated (should be done if the machine belongs to the group KVM_GUESTS). - Start
cpuspeeddaemon. - Check the maximun value in
/sys/devices/system/cpu/cpu0/cpufreq/scaling_available_frequencies - Add that value to
/etc/sysconfig/cpuspeedunderMAX_SPEEDandMIN_SPEED. - Add
processor.max_cstate=1to the kernel line in/etc/grub.conf - Reboot the host.
When installing a guest, it will fail because the first interface detected is the public one
Problem description: When trying to install a new guest machine, the virtual bios of the guest sees the public ethernet card as the first one to use (00:16:3E: MAC) and never manages to get the tftp part. This happens because at some point during the configuration of the PreProduction environment, some machines were configured with two virtual devices. Solution: New guests must be configured to use only ONE interface of the host (br0) with only ONE network card (00:10:3E: MAC). The kickstart file is configured to create a new virtual device on the system that will use the interface configured for both, the public IP and the private IP. This works because the 10.10 network runs in the same physical network of the public ethernet one.echo "TYPE=Ethernet
DEVICE=eth0
BOOTPROTO=static
IPADDR=148.187.${IP_ADDR}
NETMASK=255.255.252.0
ONBOOT=yes
USERCTL=no
IPV6INIT=no" > /etc/sysconfig/network-scripts/ifcfg-eth0
echo "DEVICE=eth0:1
BOOTPROTO=static
IPADDR=10.10.${IP_ADDR}
NETMASK=255.255.252.0
IPV6INIT=no
IPV6_AUTOCONF=no
ONBOOT=yes
TYPE=Ethernet" >/etc/sysconfig/network-scripts/ifcfg-eth0:1
What to do if you can't access the console of a guest from the web interface
Problem description: You no longer can access the VM console from the Web interface and you need to manually launch vncviewer. Solution: This usually happens because the ssh-agent is not well configured or has gone bad for some reason. Follow these steps (taken from http://www.convirture.com/wiki/index.php?title=SSH_Setupeval 'ssh-agent -s' # if you get "Could not open a connection to your authentication agent." when running ssh-add -l, do as follows killall ssh-agent exec ssh-agent bash cd convirt ./convirt-ctl stop ./convirt-ctl start-- MiguelGila - 2011-10-31


| I | Attachment | History | Action | Size |
Date | Who | Comment |
|---|---|---|---|---|---|---|---|
| |
PP_network_diagram.jpg | r3 r2 r1 | manage | 135.0 K | 2011-10-31 - 09:46 | MiguelGila | PP_network_diagram |
Topic revision: r6 - 2011-12-13 - MiguelGila

Ideas, requests, problems regarding TWiki? Send feedback